Every product we recommend is purchased with our own money and tested independently. We never accept payment to change our ratings or rankings. Last updated: May 17, 2026
Your VPN is connected. The little lock icon is green. You feel protected. But right now, your internet service provider may be logging every website you visit, because your DNS requests are leaking outside the encrypted tunnel without you knowing. A DNS leak test and fix for your VPN setup is not a one-time task you do after setup. It is something every privacy-conscious VPN user needs to understand, run regularly, and know how to resolve when something goes wrong. This guide walks you through exactly that, from understanding what causes leaks to verifying that your fixes actually hold.
Table of Contents
- Key Takeaways
- DNS Leak Test Fix VPN: What You Are Actually Dealing With
- Tools and baseline checks before you start fixing
- How to fix DNS leaks step by step
- Troubleshooting persistent and intermittent leaks
- Verifying your fixes and keeping protection solid
- My take on DNS leaks and why most VPN users get this wrong
- Find VPNs that actually protect your DNS traffic
- FAQ
Key Takeaways
| Point | Details |
|---|---|
| DNS leaks bypass VPN protection | Your ISP can see your browsing history even when your VPN appears connected and active. |
| Test before and after connecting | Run a VPN DNS leak checker with the VPN off, then on, to confirm whether a leak exists. |
| Browser DoH overrides VPN DNS | Disable DNS-over-HTTPS in each browser separately, as it can override your VPN’s DNS settings. |
| IPv6 is a common leak source | If your VPN does not support IPv6, disabling it at the OS level prevents a major leak vector. |
| Regular testing maintains privacy | Retest after every network change, VPN update, or OS update to catch new leaks early. |
DNS Leak Test Fix VPN: What You Are Actually Dealing With
DNS stands for Domain Name System. Think of it as the internet’s phone book. When you type a website address, your device sends a DNS query to translate that name into an IP address. Normally, your ISP handles those queries, which means they can see exactly what you are looking up.
A VPN is supposed to route those queries through its own encrypted tunnel and its own DNS servers, hiding your activity from your ISP. A DNS leak happens when those queries slip out of the tunnel and reach your ISP’s servers anyway, even though your VPN appears to be working. DNS leaks allow your ISP to log your entire browsing history despite your VPN being active.
The reasons this happens are more varied than most people realize. Here are the most common causes:
- IPv6 traffic not covered by the VPN. Many VPNs only tunnel IPv4 traffic. If your connection uses IPv6, those DNS queries travel unprotected.
- Split tunneling enabled. Split tunneling lets some traffic bypass the VPN entirely, and DNS queries from those apps leak to your ISP.
- Browser DNS-over-HTTPS (DoH) settings. Modern browsers like Chrome and Firefox have their own independent DoH settings that can override system DNS and bypass your VPN’s DNS servers.
- Windows Smart Multi-Homed Name Resolution. This Windows feature sends DNS queries to multiple servers simultaneously to speed up responses, often sending them outside the VPN tunnel.
- Network transitions. Switching from Wi-Fi to a wired connection, or waking your device from sleep, can reset routing tables and expose DNS queries temporarily.
Understanding which type of leak you have is the first step toward fixing it. Jumping straight to solutions without diagnosing the cause wastes time and often leaves the problem unsolved.
Tools and baseline checks before you start fixing

Before you touch any settings, you need to confirm that a leak actually exists and understand its scope. Many users assume their VPN is secure when connected but never run a single test to verify it.
Here is how to set up a proper baseline before troubleshooting:
- Disconnect your VPN completely. Go to a DNS leak test site such as dnsleaktest.com or vpntesting.com and run the extended test. Note which DNS servers appear. These should be your ISP’s servers. This is your baseline.
- Connect your VPN and run the same test again. If you still see your ISP’s DNS servers in the results, you have a confirmed leak.
- Run the extended test, not just the standard one. The extended test sends more queries and catches intermittent leaks that a quick test misses.
- Note the DNS server locations and names. If results show servers in your home country when you are connected to a VPN server abroad, that is a strong indicator of a leak.
- Test from multiple browsers. A leak that appears in Chrome but not Firefox points directly to a browser-level DoH conflict.
Pro Tip: Write down your results at each stage. Troubleshooting DNS leaks without a record of what changed is like fixing a car in the dark. Screenshots of test results before and after each fix save significant time.
Admin access on your device is required for most fixes below. On Windows, run Command Prompt as Administrator. On macOS and Linux, you will need your system password for network-level changes.
How to fix DNS leaks step by step
With your baseline confirmed, work through these fixes in order. After each one, reconnect your VPN and rerun the extended DNS leak test before moving to the next step.
Enable built-in VPN protections first
Your VPN app is the first place to look. Open your VPN settings and check for these features:
- DNS leak protection. Most reputable VPNs have this as a toggle. Turn it on. It forces all DNS queries through the VPN’s own servers.
- Kill switch. This cuts your internet connection if the VPN drops, preventing any traffic from leaking during reconnection. Enable it, especially if you are on a laptop that moves between networks.
- IPv6 leak protection. Some VPNs offer this separately from general leak protection. Enable it if available.
If your VPN app does not offer any of these settings, that is a serious gap. The best VPN kill switch and DNS leak protection features are now standard in quality providers, and their absence is a red flag worth acting on.
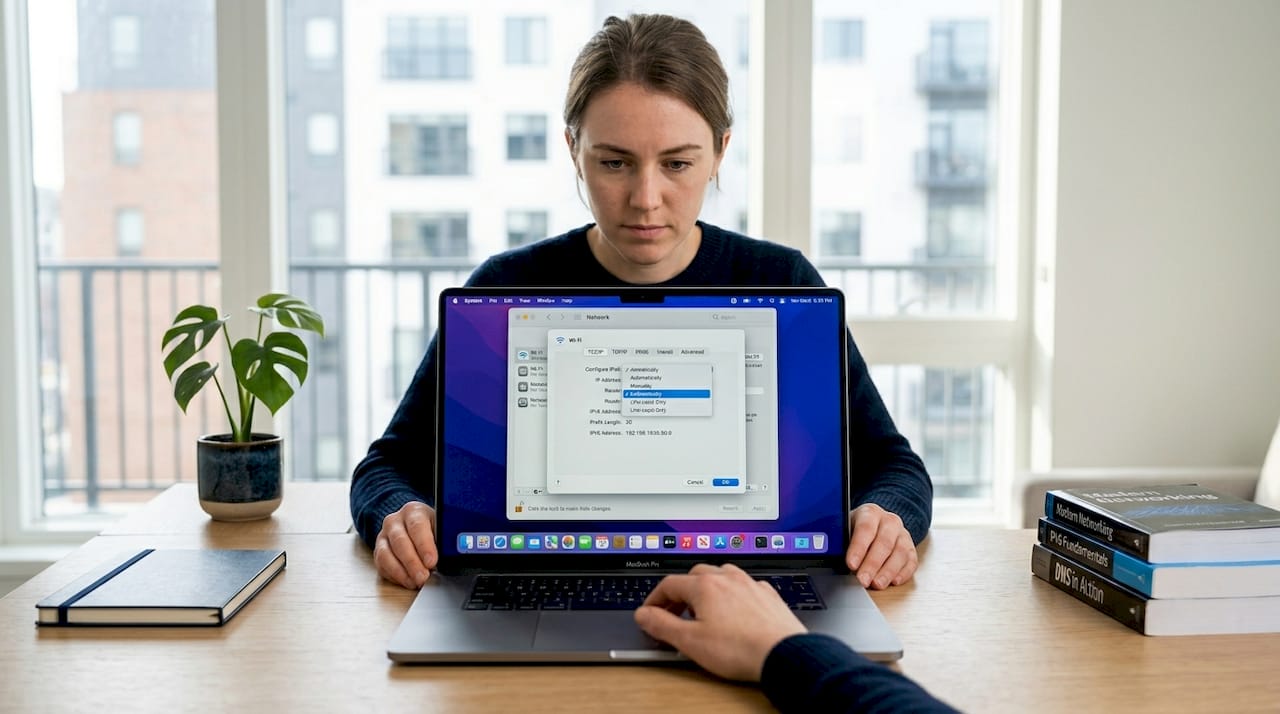
Disable IPv6 at the operating system level
If your VPN does not support IPv6, you need to disable it yourself. Here is how on Windows:
- Open Control Panel, go to Network and Sharing Center, then Change adapter settings.
- Right-click your active network adapter and select Properties.
- Uncheck Internet Protocol Version 6 (TCP/IPv6).
- Click OK and reconnect your VPN.
On macOS, go to System Settings, select your network connection, click Details, then TCP/IP, and set the Configure IPv6 dropdown to Link-local only.
Fix browser-level DNS leaks
This step catches many users off guard. Browsers have independent DoH settings that override OS-level DNS changes. You must disable DoH in each browser separately.
| Browser | Where to find DoH setting | Setting to change |
|---|---|---|
| Chrome | Settings > Privacy and Security > Security | Turn off “Use secure DNS” |
| Firefox | Settings > Privacy and Security > DNS over HTTPS | Set to “Off” |
| Edge | Settings > Privacy, search, and services > Security | Turn off “Use secure DNS” |
| Brave | Settings > Privacy and Security > Security | Turn off “Use secure DNS” |
Pro Tip: After disabling DoH in your browsers, clear each browser’s DNS cache too. In Chrome, type "chrome://net-internals/#dns` in the address bar and click “Clear host cache.” This removes stale DNS entries that could trigger false positives on your next test.
Flush your DNS cache and renew your adapter
Flushing the DNS cache resolves many persistent leak alerts caused by stale entries. On Windows, open Command Prompt as Administrator and run these commands in order:
ipconfig /flushdns
ipconfig /release
ipconfig /renew
On macOS, open Terminal and run: sudo dscacheutil -flushcache; sudo killall -HUP mDNSResponder
Reconnect your VPN after this step and retest immediately.
Manually set DNS servers
If your VPN’s built-in DNS protection is not working, manually point your system to your VPN provider’s DNS servers. Check your VPN’s documentation for their specific DNS server addresses. Alternatively, use privacy-respecting public DNS servers like those from Cloudflare (1.1.1.1) or Quad9 (9.9.9.9) as a temporary measure, though your VPN provider’s own servers are preferable for full tunnel integrity.
Disable split tunneling temporarily
Split tunneling causes elusive DNS leaks because it lets specified apps bypass the VPN entirely. Turn it off completely in your VPN settings, retest, and only re-enable it if you confirm the leak is coming from elsewhere. If re-enabling split tunneling brings the leak back, that application is the source.
Troubleshooting persistent and intermittent leaks
Some leaks refuse to disappear after the standard fixes. These are usually caused by software conflicts or OS-level behaviors that are less obvious.
“The most frustrating DNS leaks are the ones that only appear sometimes. They pass your initial test, then show up again an hour later after your laptop reconnected to a different network.”
Network transitions frequently trigger DNS leaks. Every time your device switches between Wi-Fi networks, connects to a wired adapter, or wakes from sleep, the OS can reset routing tables. Your VPN may not re-establish the DNS tunnel fast enough, leaving a window where queries leak. The fix is to always reconnect your VPN manually after a network change rather than relying on auto-reconnect.
Watch for these less obvious culprits:
- Security software hijacking DNS. Antivirus programs and firewalls sometimes redirect DNS queries through their own servers for filtering. Check your security software settings and whitelist your VPN’s DNS servers if possible.
- Windows Smart Multi-Homed Name Resolution. This feature is enabled by default on Windows 10 and 11. It sends DNS queries to all available network interfaces simultaneously. Disable it through Group Policy Editor: go to
Computer Configuration > Administrative Templates > Network > DNS Clientand set “Turn off smart multi-homed name resolution” to Enabled. - Router-level DNS settings. Your router may be overriding DNS settings for all devices on your network. Log into your router admin panel and check if it is pointing to your ISP’s DNS servers. Update it to use your VPN provider’s DNS or a privacy-respecting alternative.
If you have worked through every fix and leaks persist, the honest answer is that your VPN provider may not be capable of preventing them reliably. Choosing a VPN built for privacy with verified DNS leak protection is sometimes the only real solution.
Verifying your fixes and keeping protection solid
Fixing a DNS leak once is not enough. Networks change, apps update, and OS patches can quietly reset settings you thought were locked in. Here is how to maintain solid DNS leak protection over time:
- Run a full DNS leak test after every VPN update. App updates sometimes reset custom settings, including leak protection toggles.
- Retest after every OS update. Windows and macOS updates occasionally change network stack behavior and can re-enable features like Smart Multi-Homed Name Resolution.
- Test immediately after any network change. New Wi-Fi network, new router, or a switch from mobile data to Wi-Fi all count as network changes that can trigger new leaks.
- Keep your router firmware updated. Outdated firmware can introduce DNS handling bugs that create leaks even when your VPN is correctly configured.
- Confirm your kill switch is active. A kill switch prevents any traffic from leaving your device if the VPN drops. Test it by manually disconnecting the VPN while browsing and confirming your internet cuts out immediately.
Bookmark a reliable VPN DNS leak checker and make running it a habit, not a one-time event. Two minutes of testing every few weeks is a small investment compared to the privacy exposure of an undetected leak.
My take on DNS leaks and why most VPN users get this wrong
I have reviewed dozens of VPN services and spoken with privacy-focused users across remote work, travel, and high-sensitivity browsing contexts. The pattern I see repeatedly is this: people set up a VPN, confirm it connects, and then never think about it again. That false confidence is exactly where DNS leaks do their damage.
What I have learned is that the green “connected” indicator in a VPN app tells you almost nothing about whether your DNS queries are actually protected. 5 out of 6 commercial VPNs leaked their VPN signature in under 1.5 seconds in independent testing. That is not a fringe problem. That is the norm.
My practical advice is to treat your VPN like any other security tool: verify it, do not just trust it. The browser DoH issue alone catches experienced users off guard because it is not intuitive that your browser operates its own DNS system independently of your OS. Disabling browser DoH is one of the highest-impact, lowest-effort fixes available, and most guides bury it or skip it entirely.
Pick a VPN that has built-in DNS leak protection, a kill switch, and a verifiable no-logs policy. Then test it yourself. Trust but verify is good advice. In privacy, verify first and trust later is better.
— Deep
Find VPNs that actually protect your DNS traffic

At Privacytoolslab, we test VPN services specifically for the features that matter to privacy-conscious users: DNS leak protection, kill switch reliability, and no-logs policies that hold up under scrutiny. If you have worked through this guide and are still seeing leaks, or if you want to start with a VPN that has these protections built in from day one, our kill switch and DNS leak protection guide compares the top options head to head. For users who need a VPN that works reliably across geo-restricted regions without exposing their DNS traffic, our secure geo-restriction VPN guide is the right next read.
FAQ
What is a DNS leak in a VPN?
A DNS leak occurs when your device sends DNS queries outside the VPN’s encrypted tunnel, exposing your browsing activity to your ISP even though your VPN appears connected.
How do I run a DNS leak test?
Visit a VPN DNS leak checker site like dnsleaktest.com, run the extended test with your VPN connected, and check whether your ISP’s DNS servers appear in the results instead of your VPN provider’s servers.
Why does my VPN still leak DNS after enabling leak protection?
Browser DNS-over-HTTPS settings often override VPN DNS configurations. Disable DoH in each browser separately, flush your DNS cache, and retest to confirm the fix.
Can split tunneling cause DNS leaks?
Yes. Split tunneling allows some application traffic to bypass the VPN tunnel entirely, and DNS queries from those apps go directly to your ISP’s servers, creating a leak.
How often should I test for DNS leaks?
Test after every VPN update, OS update, and network change. A quick extended test every few weeks catches new leaks before they become a long-term privacy exposure.
Recommended
- Best VPN Kill Switch & DNS Leak Protection 2026 – PrivacyToolsLab
- Best VPN for Privacy No Logs Kept 2026 – PrivacyToolsLab
- PrivacyToolsLab – Honest VPN reviews and AI tool comparisons. Independent expert recommendations to help you choose the right privacy and productivity tools for 2026.
- Best VPN for Privacy on Public WiFi 2026 – PrivacyToolsLab
Article generated by BabyLoveGrowth
🔒 Our #1 Recommended VPN
NordVPN — Military-grade encryption, 6000+ servers, no-logs policy.
⭐⭐⭐⭐⭐ Trusted by 14 million+ users. 30-day money-back guarantee.
✅ 30-day money-back guarantee
🛡️ Fast & Secure VPN
IPVanish — 2,400+ servers in 90+ locations. Connect unlimited devices simultaneously.
⭐⭐⭐⭐⭐ Zero-logs policy. 30-day money-back guarantee.
✅ 30-day money-back guarantee
🧊 Privacy-First VPN
IcePrivacy VPN — Premium privacy protection, strict no-logs policy, fast global servers.
⭐⭐⭐⭐⭐ Built for users who take privacy seriously. 30-day guarantee.
✅ 30-day money-back guarantee
📚 Related Articles